Tuesday, April 26, 2011

Soda Can Stove 2

Just a follow up with some pictures of two stoves that we made last night.  They burned great, a little crazy at first but as the seams tightened up they burned awesome.  Two tablespoons of denatured alcohol will burn for about 10 minutes.


Thursday, April 21, 2011

Soda Can Stove

Check out this website for a great homemade backpacking stove.  Anybody with a little patience and some empty soda cans can make one of these stoves and they weigh next to nothing so they are a great addition to your hiking pack.

http://www.thesodacanstove.com/stove/


Wednesday, April 20, 2011

Caring For Blisters

Here is a great way to deal with blisters on the go thanks to the U.S. Army Survival Handbook.  Always keep blisters intact in order for the blister to protect itself.  To avoid having a blister burst or tear under pressure and cause an open sore you can drain it.

First get a sterilized sewing needle and clean thread
Clean the area around the blister and run the needle and thread through the blister
Detach the needle and leave the thread hanging out both sides of the blister
The thread will absorb the liquid inside the blister and keep it from bursting
The thread also keeps the hole in the blister from closing up and allows it to dry
Pad around the area to relieve pressure and continue to keep it clean

Sun Compass

Shadow-Tip Method

Find a straight stick about 3 feet long
Place the stick in the ground in a level area
Mark the shadow's tip with a stone or twig (this first point is always West)
Wait 10-15 minutes until the shadow moves and mark the tip of the shadow again
Draw a straight line through the 2 points and that is your east-west line
Stand with your first mark on your left and your second mark on your right and now you are facing North

This method will work anywhere on earth
To make it more accurate wait 30-45 minutes and make 3 or more marks as the shadow moves


Thursday, April 14, 2011

Survival Acronym

This is a good acronym from the U.S. Army Survival Handbook that will help you to remember what to do in  a survival situation.

S-size up the situation (surroundings, physical condition, equipment)
U-Use all your senses; Undue haste makes waste
R-Remember where your are
V-Vanquish fear and panic
I-Improvise
V-Value Living
A-Act like the natives
L-Live by your wits; Learn basic skills now

Wednesday, April 13, 2011

Minimalist Outing

A friend and I were having a discussion the other day about doing a couple day outing with only three supplies allowed.  Water and a backpack not counting as one of the three what would you take?  A pocket knife, a tent, sleeping bag, food, matches or maybe a weapon of some sort?  Keep in mind we were talking about covering 15 to 20 miles, so whatever you take it must be light and easily carried.  I think I would opt for a jacket of some sort cause it is still getting fairly cold at night, maybe a multi-tool, and then some sort of food like an MRE.  What are the three things you would take along?

Tuesday, April 12, 2011

CamelBak TriZip

I received my CamelBak TriZip backpack today.  Here are some initial pictures and thoughts with a field test to follow.  I am impressed with the quality of the construction, it is made with 500D cordura with what looks to be excellent heavy duty zippers.  There are two outside pockets; one with room for a 1 liter water bottle and the other with sewn in dividers for organizing small equipment.  It comes with a 100 oz / 3 liter Omega bladder with a quick disconnect hose and an insulated drinking tube.  The bag weighs in at 4.8 pounds empty and with the bladder full it weighs 11.3 pounds.  The total volume for the bag is 34.4 liters and it's dimensions are 20in x 13in x 11.5in.  The interior of the pack has two net pockets that aid in organization as well as two straps for securing internal loads.  I really like the design of the Y shape zippers which allow you to fillet open the bag and access all it's contents at once.  There is a top pocket that is soft lined which is good for goggles, glasses, electronics, or any equipment you need quick access to.  The bladder is located in a separate pocket between the harness and the pack and it has high and low exit ports for the drinking tube.  The best part of this pack is supposed to be the Mystery Ranch adjustable harness which adjusts up and down to create a more personal fit depending on your height or for conforming if you are wearing body armor.  I plan on loading this pack up and doing a little hiking this weekend so I will post my field reviews soon.


Monday, April 11, 2011

Pine Needle Tea

Pine needle tea has very high levels of vitamin C and A.  It can have more vitamin C than 6 lemons.  First you need to pick the newest green pine needles you can find, they are normally located at the end of the branch and are lighter green than the rest.  You should use about a 1/2 cup of needles to about 1.5 pints of water.  You can either chop them up or just put them into the cup whole.  It is recommend that you bring your water to a boil first then add the needles.  Boil for about 20 minutes and then allow it to cool for another 20 minutes or so.  The tea should be a reddish color with a mild pine taste and smell.  Remember boiling the needles too long will cause the vitamin C content to diminish.  The longer you allow the tea to sit after boiling the stronger the tea will be.  Stir and Enjoy!

WARNING!!!  Do not consume pine needle tea if you are pregnant or even think you might be pregnant.


Lean-to Shelter


This is a lean-to I made while out camping the other day.  It took me about 20 minutes to gather all the materials and another 10 minutes or so to construct it.  If I would have been spending the night in this lean-to I would have kept adding materials throughout the day and continued to make the insulation better.  It is also a good idea to enclose the end where your feet are to keep the wind out.  Another good idea is to clear an area around the opening of the shelter so you can lite a small fire if you get too cold.

Basic Shelters


 In Arizona we have so many different landscapes that when it comes time to talk about shelters we have a multitude of choices.  In the winter in northern AZ we can build anything from a snow cave to a lean-to.  In the southern part of the state our choices are a little more limited and require us to be very resourceful.  I want to look deeper into making a shelter in the desert regions of the state.  If you have packed a good survival kit you should have the required materials available to set up a tarp lean-to or cuddle up under your space blanket.  But, if you failed to pack appropriately (shame on you) there are plenty of things we can use to build a shelter.  Our first concern in building a shelter is to get us out of the hot day time sun and second to keep us warm once the sun sets and the temperature plummets.

The first and most basic shelter is referred to as a cocoon.  You simply find as much debris and vegetation as you can find and cover your self with it.  The other option is to gather everything you can find make a large pile and slide into it like a snake.  Be sure to check for scorpions and big thorns when choosing material for your cocoon.

The second shelter I would recommend is a simple lean-to.  I like to use spines from dead saguaro cacti because they tend to be abundant, straight, and easy to break and stack.  All you need to do is find a boulder, tree, or overhang and start leaning the sticks against them at a 45 degree angle.  Note: the steeper the angle the better it will shed rain and water.  After you have a base layer of sticks stacked together you need to cover them with any type of vegetation or solid objects you can find.  This second layer is meant to help block the sun, wind, and rain.  Remember to make the shelter just big enough to fit yourself and your gear.


Other options you have for building shelters in the desert are tepee style and A-frame style.  Both of these are built just like the lean-to but instead of building only one side you have to have a center support and build your shelter on both sides.

Real Life Survival

Over the past few weeks I have read 4 different survival books, watched several videos, and read countless descriptions of how we are supposed to survive in the outdoors.  These "professional survivalists" throw around all these great ideas about how to survive, but my question is, do they really work?  Would the average person out lost in the outdoors really know how to use these techniques?  Under a stressful survival situation what techniques should the average person even attempt.  Over the next couple of months I am going to put all of these "techniques" into practice and see what really works.  Bear Grylls, making a wet suit out of a dead seal, come on!!!

Eating Scorpions

I wanted to add this to the last scorpion post.  Supposedly you can eat scorpions and some say they taste like shrimp.  All you have to do is catch them, cut off their tails and any poison sack and enjoy.  Out in the wild you can catch scorpions by finding their hiding spots and digging a steep sided hole right next to it.  Scorpions can't climb up steep banks so if you dig your hole steep enough it should trap the scorpions.  You can also bury a bottle or a can and use that as a trap.  One way of cooking them is to skewer and roast them over a fire until they are golden brown.  I would only recommend eating scorpions in a survival situation but if you are in to that kind of thing feel free to send me a video of your experience!  Next time I find one I am going to give this a try and I will post a video of it so you guys can make fun of my weak stomach.

Bark Scorpions


Since I found a scorpion in the garage the other day I figured this would be a good topic to talk about. I did a little research and found out that scorpion fossils have been found from over 430 million years ago.  There are a total of 1400 different species of scorpions in the world and a total of 40 to 60 different species that call Arizona home.  The species that is of most concern to us is the bark scorpion (officially known as Centruroides sculpturatus).  Bark scorpions are small, usually between 1 to 3 inches in length and are a light brown/tan color.  These scorpions can live to be 6 years old and prefer to live in bark, rocks, wood piles, or any dark crevice they can squeeze into.  In cities they are often found in the gaps of concrete block fences.  The reason they are found in homes because they are able to fit through gaps as small as 1/16 of an inch.  Bark scorpions ambush their prey normally at night and prefer to feed on crickets and roaches.

Bark scorpions are incredibly resilient.  Experiments have been done where they have frozen scorpions for weeks, and after thawing the scorpions emerge unharmed and unaffected. During nuclear testing scorpions, cockroaches, and lizards were found near ground zero with no recorded effects.

The bark scorpion is the most venomous scorpion in North America, and its venom can cause severe pain, numbness, and tingling.  The pain typically lasts between 24 to 72 hours. Temporary dysfunction of the sting area is common and the sting area can become immobilized or experience convulsions. It may also have an effect on breathing for a short period of time. Due to the pain many victims describe a feeling of electrical jolts after being stung.

Basic First Aid
Clean the sting site with soap and water
Apply a cool compress (cool damp cloth, no ice)
Take acetaminophen or ibuprofen to help with pain and swelling
Also rubbing the pulp from a prickly pear cactus on the sting site is said to help relieve the pain.


The best way to get rid of scorpions is to spray them with pesticides (it is better to spray at night when they are moving around).  Another popular way to find scorpion is at night with a black light.  Scorpions glow brightly under the UV light and are fairly easy to find.  Most stores carry UV flashlights and I am sure a trip around your backyard at night with a UV light will reveal just how many scorpions call Arizona home.

Personal Survival Kit

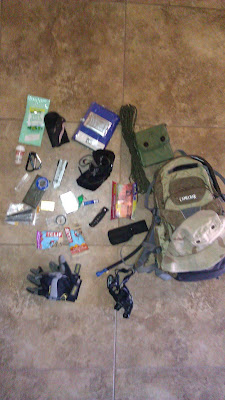
We all have a backpack or fanny pack that we take with us when we go into the outdoors, but how much thought do we put into what we take.  Most people I know simply fill their packs with water, granola bars, and maybe a knife or multi-tool and head off on their adventures.  What should we really be taking in our outdoor packs?

This is a list of MINIMUM items that should be included in your outdoor packs: Bandana, Compass, Flashlight plus extra batteries, 2 Large garbage bags (preferably orange), Lighter, Matches, Magnesium flint striker, Metal cup, Multi-tool or Swiss army knife, Painkillers, 25 feet of parachute cord, Protein bars, Sharp knife, Solar or space blanket, Whistle, and Ziploc bags.

Like I said this is only a list of minimum requirements for your personal survival kit and items can always be added to suit your individual needs.  A more complete survival kit would include some of the following items in addition to the minimum items listed above: Candles, Dried food, Duct tape, Tinder for fire starting, First-aid kit, Fishing kit (hooks, sinkers and line), Flares, Hand held GPS, Map, Orange surveyor's tape, Money, Needle and thread, Pencil and notebook, Safety pins, Folding saw, Signal mirror, Snare wire, Personal location beacon or SPOT satellite messenger, Water purification tablets, Water purification pump, and Gloves.

As always use this list as a guideline for packing your survival kit and feel free to personalize your kit to suit your specific needs and the region you are traveling in.  Feel free to add comments about items you include in your personal survival kits.

Edible Desert Plants


I learned something new the other day that will help me in my never ending quest to find natural sources of nutrition while in the outdoors.  In Arizona we are "blessed" with an abundance of plants that are always trying to stab, stick and injure us, so now is the time we finally get to strike back!  One of the most edible plants we have throughout Arizona is the prickly pear cactus. The prickly pear cactus provides us with a few different parts we can eat.  First the fruit, the pinkish, purplish and sometime white part that grows out like a flower.  All you have to do to enjoy the fruit is remove the outer layer, taking special care to remove all the spines, especially the small hair like ones.  There are many ways to use the fruit from simply eating it, to turning it into jam, jelly, sorbet, or wine.  The other part of the plant we can eat is the pad or main part of the plant.  If you are in a survival situation I would recommend cleaning off all the thorns, peeling the outer layer back and enjoying.  If you are eating them at home or in a more controlled environment you can boil them, bake them, grill them or add them to other foods such as salads, omelets or tacos.  The pad of the prickly pear can also be a good source of much needed liquid while out hiking in the heat.

Water Sources

I'm currently reading a survival book named "Survive" written by Les Stroud, host of the popular TV show Survivorman.  This is going to be the first of many posts I write about this book because I am so impressed with all the great practical knowledge Les has acquired during his career.  The part that I am reading now and I feel is very important due to Arizona being located in the dry desert southwest, deals with finding water in survival situations.  I want to go into more detail later concerning secondary water collection and how to make ground and vegetation stills, but for now I think it is important to know that even in Arizona there are a lot of places to find primary sources of water.  Primary sources include springs, rivers, streams, lakes, and ponds.  A few ways to locate water according to the book include:

1. Walking downhill; water, especially in the desert tends to accumulate in the bottom of valleys and low lying areas
2. Observe changes in vegetation; vegetation that is darker green and denser than the areas surrounding it tends to indicate water...you may have to dig a little to find it
3. Follow animal trails; animals need water as much as we do, animal trails don't always indicate water but if you see multiple trails coming together there is a good chance they lead to water
4. Follow birds; birds tend to hang out near water, the direction of bird flight in the early morning or late afternoon may indicate a water source
5. Track insects; insects tend to congregate near water sources, also keep in mind that bees never live more than a few miles from water

Les Stroud. Survive, HarperCollins. p 69-94.